Sunday, August 14, 2005
HOW TO MAKE A FAKE LOTTERY TICKET
When Irish Eyes Are Smiling and The Night approached me this past summer with a fake lottery ticket hoax project that proved to be quite a bit of work but a lot of fun. 'Hoax' is actually not the best word for the project, since it involved a marriage proposal, but you get the idea. In case you ever have the opportunity or need to pull a similar hoax, this guide should help smooth the process.
THE ASSIGNMENT
When Irish Eyes was planning to propose to his long-time girlfriend. He had a unique scenario in mind to do it. He envisioned taking her out for dinner, after which the waiter would bring her a very convincing looking promotional scratch-and-win ticket. She would scratch off the ticket to discover she had won a diamond ring. The skill-testing question on the back would read "Will you marry me?"
Sounds like a job for the Mind-taker! I feel it is never a waste of time or effort to invest in either romance or comedy, and this project had both.
RESEARCH
Several options were investigated:
1) We looked at getting the job done start-to-finish by a professional printer. For a one-off project, this proved not feasible, since the set-up costs alone would run over $200. As well, even the smallest print run would leave dozens or hundreds of superfluous extra tickets left over.
2) Commercial products. There are several companies that offer scratch-off labels you can apply over top of your own text. Unfortunately, these were not available locally and shipping time to order over the internet would have run several weeks. As well, these typically come in small standard sizes and shapes (usually 1" round) that would have severely limited design options.
THE SOLUTION
The font of all knowledge, Google, revealed a formula for creating your own hand-made scratch-off surfaces.
WHAT YOU WILL NEED
- A bottle of rubber cement
- A small bottle of acrylic craft paint in whatever colour you like (we used gold)
- A selection of craft brushes including an ultra-fine brush
- Printer-ready card stock (we used Epson Matte Heavyweight)
- A straight edge
- A hair dryer
- Graphic designer (optional)
- Patience
HOW TO DO IT
1) Hire a graphic designer. The most important step is to ensure that the 'look' of the ticket is very convincing. Unless you are artistically inclined and proficient in Quark or Photoshop, a good graphic designer will save you a lot of misery. You can find them in the phone book or ask a print shop. For a small job like this, the designer shouldn't charge much more than $50.
2) Design your scratch off area to anticipate human nature. Most people scratch tickets from left to right and up and down. Fool them into thinking they are going to win a different smaller prize with effective design.
3) Have the designer send the finished design to you in a high-resolution PDF sized to the exact dimensions you will need. Set your colour printer on the highest print quality possible and print out several copies on heavy card stock. This won't be print-shop quality, but it will be more than enough to fool the victim for a few moments.
4) Apply a medium coat of rubber cement onto the scratch area. This coat should be heavy enough to ensure there are no gaps in the surface but not so heavy that the surface becomes too thick and gummy. The rubber cement ensures that the paint doesn't stick to the paper and allows the scratching-off effect.
5) Apply the first coat of paint in a two-stage cross-hatch pattern (like number sign #). This, I discovered, is important because if the paint dries as one single flat surface it will tend to scratch off in one big ugly clump, rather than the flake-off effect you're looking for. Paint a cross hatch over about half the surface. Let it dry or blow-dry it. Fill in the remaining spaces and let that dry.
6) Apply a very thin second coat of rubber cement on top of the dried paint.
7) Apply a second coat of paint, remembering to use the two-stage cross-hatch again.
8) Apply further thin coats of paint as necessary to hide the underlying print and/or to smooth over the previous cross-hatch pattern. Further layers of rubber cement are not necessary at this stage.
10) Outline and square off the edges of the scratch area with acrylic paint using an ultra-fine brush and a straight edge. The outline does not need to have rubber cement underneath. This takes a steady hand and a lot of patience or it will end up looking sloppy and therefore unconvincing. Expect to do several versions of the ticket before you get this part right.
11) Even if you have previously used a blow-dryer, allow the whole ticket to dry naturally overnight. This seems to improve the flaking-off effect and minimizes clumping.
THE RESULTS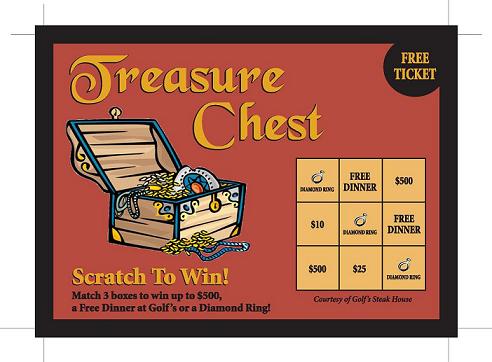

Mission Accomplished. Thanks both to the ticket design and effective staging/scripting, the future Mrs. Irish Eyes was completely fooled. A great deal of joy-filled screaming and crying in the middle of a restaurant was induced. The answer, of course, was 'Yes' and a life-long happy memory was created.
Congratulations Ryan and Jocelyn. It was a privilege to be a part of this happy event.
posted by Mentok @ 11:15 a.m.,
![]()
1 Comments:
-
At 8:29 p.m.,
 NL-ExPatriate said...
-
Ahh Mentok you old softie!!

